
 Have you ever wondered if there was an induction cooktop that had it all? Great temperature control, enough programmable cooking time to fit your cooking style, worked with smaller pans, and greater portability? This unit is close to perfection. Enjoy the reading and discover why I think this is the case.
“Meals Cooked to Perfection” – so says the manufacturer – Heartware inc of Nuwave PIC 2 induction cooktop, located in Libertyville, Illinois.
And it’s not too far away from its purpose starting with home users, people who travel (military, truck drivers etc ) and ending with industrial users (even if the item was not designed for them) : hotels, restaurants, food companies.
The users have used it and tested it, the results?
1. Controls
The Nuwave PIC 2 induction cooktop has a crowded control panel. This might lead you to think that is hard to use or has a lot of functions which you would never use.
BUT that is not the case. Once you start cooking you will want to discover what this little “UFO” can do and meal ideas will start flowing.
The Control Panel is placed at the front of the item and is curved downward. Iin fact, the entire cooktop is rounded (which sets it apart from competitors). The way it is manufactured keeps it lightweight.
Let’s see what you can do the controls and how to use them

START – located at the upper right corner of the
Control Panel, this will let you start the item after you have put a pan on it. In fact you need to be prepared with all necessary cooking stuff before pushing “START”. When you press “Start” the item will be heated at a High level (425 F) being the default setting. If you want to adjust to a lower level you can use the “Low” control or just press + or –until you get the desired temp.
Pause/Clear – located at the left of the Start button this will help you to Pause or Shut off the item. For Pause you will need to press the button once and this will pause the item at the cooking stage. The temperature will remain on Led Display and the surface will cool down but the F will blink. If you want to resume you need to press START. The Pause function is useful if you need to put the item on hold in case you have something to do and can’t be near the cooktop. Then, when you are freed up you can start from where you left off. I think this a great feature which I didn’t found in either the Duxtop or Max Burton.
If you want to SHUT DOWN the item you will need to press the button twice. The settings will be lost, the LED Display will show a “0” and the system will shut down.
Time – located at the left of the LED Display this helps you to set the cooking time. If you want to use the Time function you need to press the Time button. A “0” will appear on the LED Display and then you can use it to adjust the time. Every time you press the Time button a digit will blink. The time format is 00.00, where the first 2 digits represent hours, the last 2 digits are minutes. The maximum time allowed to be programmed is 99 hours and 60 minutes (which means 100 hours). This feature makes the Nuwave PIC 2 stand out from competitors.
Let’s take an example to see exactly how the Time button needs to be used.
Let’s suppose we need to boil an egg for 5 minutes, we need to follow these steps:
1. press the Start button;
2. Press Med button (under Time control, this will set the temp to 275 F and will be displayed by LED Display. If you want to adjust to 212 F you can use the “–“ control to decrease the temp.);
3. Press Time once (00.00 will be displayed with the last digit blinking );
4. Press + control until you reach 5;
5. Press Start and the timer will start to count down.
The Led Display will show only hours and minutes.
Let’s consider another example where you need a programmable time of 14 minutes.
1. Press Time once
2. The last digit will blink and using the + control increase to 4
3. Press Time once again and the near digit will blink
4. use + control to increase to 1
5. Press Start.
And to program 2 hours and 31 minutes we would take these steps:
1. Press Time once;
2. Last digit will blink and using + we adjust to 1;
3. Press Time again, once;
4. Last digit will start to blink, use + control to increase to 3;
5. Press Time again
6. Last digit from hours will start to blink, use + to increase to 2.
7. Press Start button.
Prog – here is where the fun starts. The button is located at the upper left of the control panel. With this button you can program different stages of cooking. For example, if you want to boil first for 10 minutes then reduce to a simmer for 15 min and lastly keep warm for 30 minutes you need to follow these steps:
1. Press Prog button;
2. LED Display will show “PRO”;
3. Press Max/Sear button;
4. Press the Time button twice and 00.00 will be displayed with last but one digit blinking;
5. Press + control to increase to 1 (so 10 minutes will be set)
(these are steps for first cooking stage: boil for 10 minutes)
6. Press Med Low button;
7. Press Time once;
8. Press + control to increase to 5;
9. Press Time once;
10. Press + control to increase to 1
(these are steps to simmer for 15 minutes)
11. Press Low;
12. Press Time twice;
13. Press + control to increase to 3
(these steps will do the last cooking stage: keep warm for 30 minutes)
14. Press Start
You can have up to 10 cooking stages. A cooking stage is a part of a program. Taking the example above “boil for 10 minutes” is called a cooking stage. All time embedded into cooking stages can’t be more then 99 hours and 60 minutes.
Start Later/Delay Function – this will help if you want to delay the start of a program/stage cooking. Let’s say you want to delay the above program for 5 minutes. To activate this function you need to follow these steps:
1. Press Prog (Prog will appear );
2. Press Time once (0 will start blinking);
3. Press + control to increase to 5;
4. Press Prog and continue with creating your personalized cooking stages explained in the above example with 10 min for boiling, 15 minutes for simmer and 30 for warming.
The Control Panel is structured having 2 lines of buttons. The first line refers to functions (which was covered above ) and the second line refers to setting temperatures. There are 6 buttons which let you activate a specific temperature very fast.
Low – this button can be used if you want to keep the meal warm. The temperature that it set is 100 F (38 C?). Also, the panel display will show 100F/38C.
Med Low – for simmering this option is perfect. The button set the temp at 175F (78C) and the LED panel will display exactly this 175F/78C.
Med – for steaming you can use this button which will set the temp to 275F (135C)
Med High – Chinese food time? No problem. This button will help with stir frying. The temp set will be 375F (191 C).
High – would you like to surprise your family with a French cooking style? This button will help you to boil/saute. The temp set will be 425F/218C also you will see it on the LED.
Max/Sear – this button will shorten your waiting time in case you want to boil something fast. You get the 575F/302C.
You can also change these temps by using + or – controls. The minimum temp being 100F and max is 575F. The temp step for increasing/decreasing is 10 degrees. Having the possibility to choose an exact cooking temperature will help you to comply with the instructions in your preferred cooking recipes.
2. Surface
The surface is black in color and has a circular form. It’s made of heat resistant ceramic glass.
On the surface you will see the Nuwave logo, 2 circles (the smallest is red and the bigger white ) and the warning message “Cooking surface can remain hot even after cooking”.
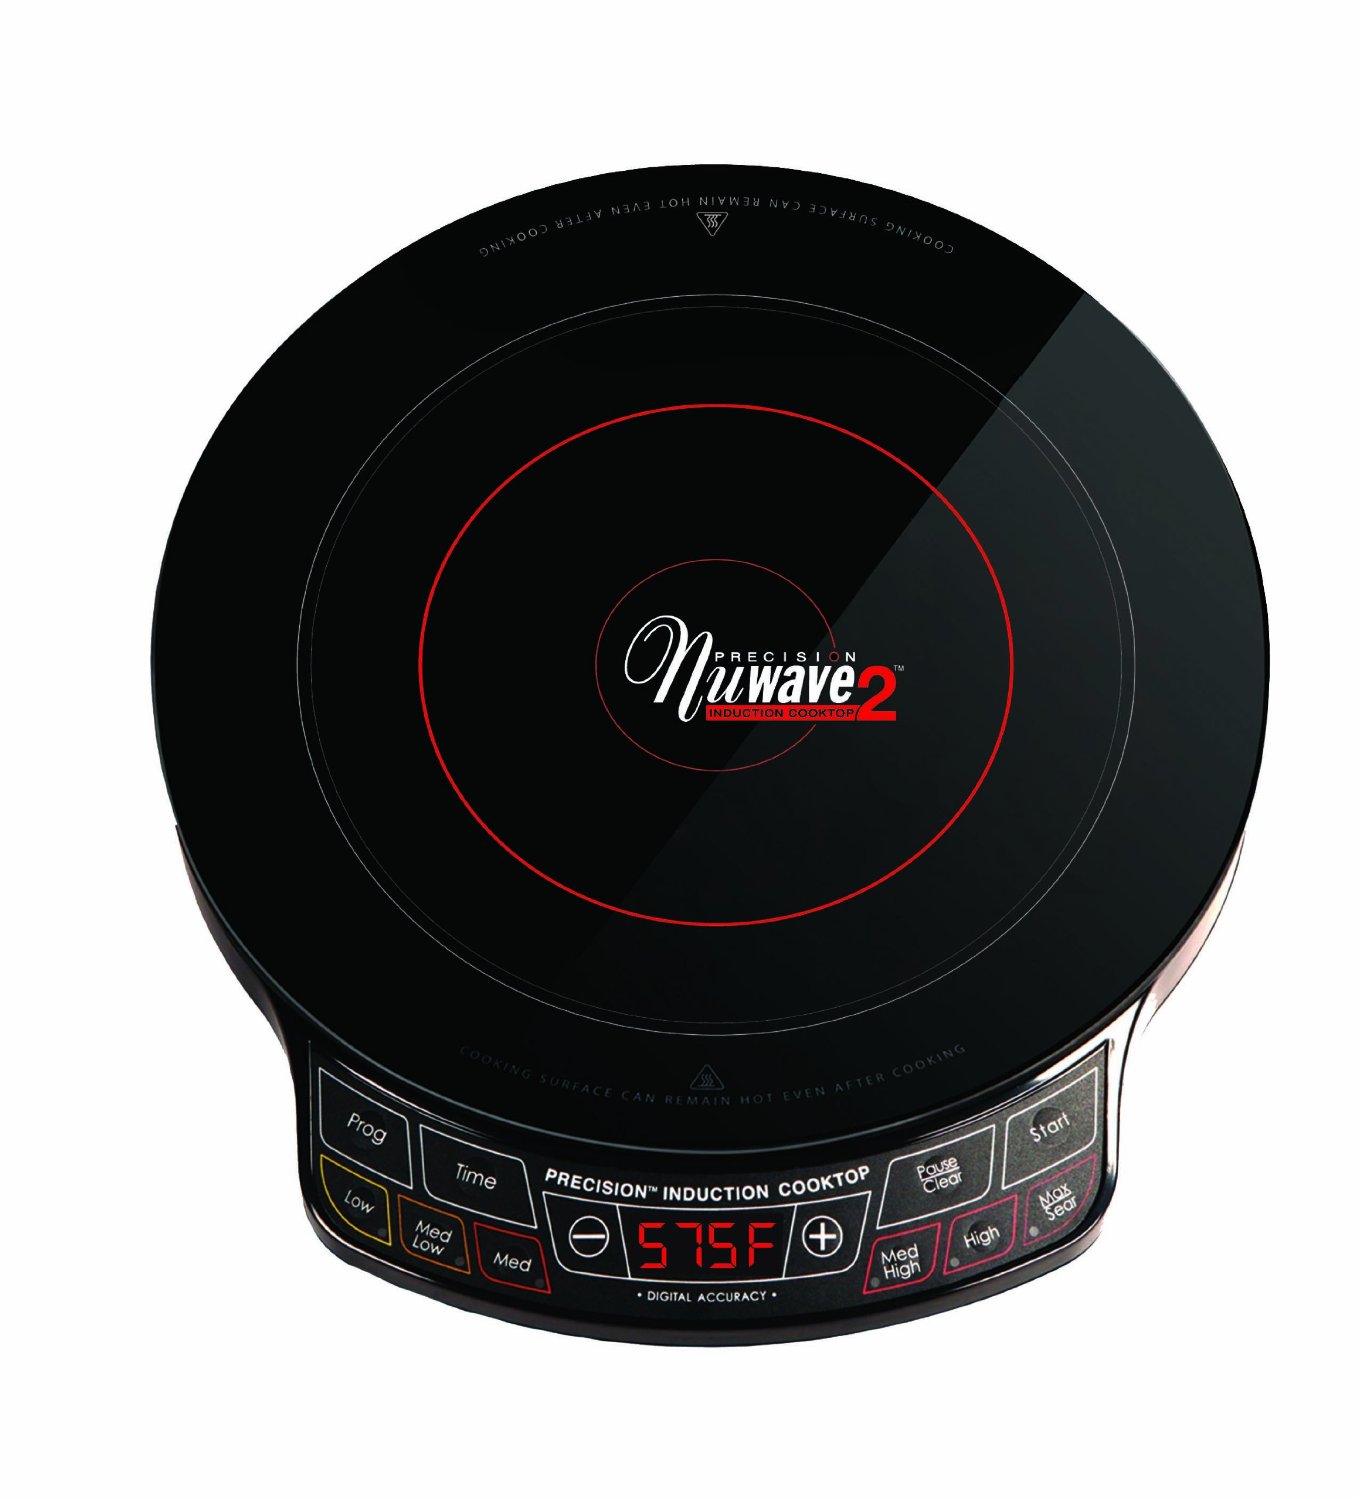
The red circle has a 5 inch diameter and the white one is 9 inches.
Cleaning can be done by wiping with a damp cloth.
If you are thinking to use a stockpot you need to be careful because the surface can support only 50 lbs.

3. Heating Elements
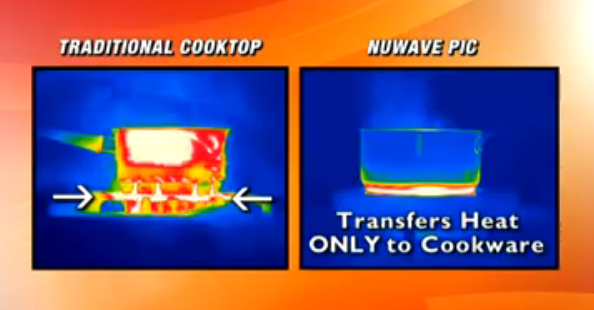
The NuWave PIC 2 has one heating element positioned under ceramic glass which heats the bottom of a pan using induction technology.
The pan must be induction compatible. To check this you can try to see if a magnet fridge sticks to the bottom of the pan.
The size of the heating element is 9 inches being marked with the big red circle and because of induction the pan will be heated uniformly even if the bottom of the pan is 10 inches in diameter.
The manufacturer advises not to use pans with bottoms larger than 12 inches. In case you use a pan with a 12 inch bottom the heat will transfer more slowly to the edges.

4. Power/Watts
The NuWave PIC 2 needs AC power so you will need an 120 V/30 amp socket. The item should be the only one connected in the outlet.
The cooktop has 1300 watts.
I was amazed to find out that an induction cooktop with a power of 1300 watts may issue a temperature of 575 F (320 C), much more than an 1800 W cooktop like Duxtop or Max Burton.
That means you will save on your energy bill as compared to using either of the other two models and if you need a portable cooktop when you go camping, NuWave PIC 2 will need less power to run using a power generator.

5. Sensors
There are 6 sensors which notify the user about a problem or are just for protection.
Pan Presence/Induction Cookware Ready – E1 error code will be displayed if the cooktop doesn’t detect cookware or is not induction ready. You will hear a beep when the error code will appear.
Failure Sensor – the codes E2, E5, E6 notify the user that the item has problems and can’t work properly. The manufacturer doesn’t specify exactly what these codes means and what parts could be affected. (Can you contact them to find this information or might it be listed in a manual of a similar product made by the manufacturer?)
Low Voltage Sensor – the control panel LED displays code E3 when the unit’s voltage is under 85 Volts.
High Voltage – the LED will show E6 error code if the unit’s voltage reaches 144 volts.
Overheating – the E8 code will notify us that the cooktop has reached 20 F degrees over the 575 F Max/Sear level. It will beep once and turn off.
Total Time Sensor – the “FULL” text will be displayed on LED when the programmed time reaches 100 hours (99 hours and 60 minutes).
6. Ventilation
The NuWave PIC 2 has air vents located on the back. This way the item is very well ventilated and the cooking surface is not heated.
We need to be careful that around the item we’ve allowed enough free space.
Some users clean the fans with a hand vacuum every month.
The noise created by the fans is not too loud – it’s like a computer fan.
The ventilation system will still work almost 60 sec after you will press “Pause/Clear” or cooking has stopped.
7. Safety Features
The NuWave PIC2 has been tested and found to respect FCC rules (part 18).
The item is equipped with 10 sensors which return 10 error codes in case of bad use or malfunctions. Starting with the Pan Presence sensor which beeps every 2 sec for 1 minute if cookware is not present and ending with Over Heating sensor. All these make this item safe to use.
I like that the unit doesn’t burn spills so your kitchen will not be full of smoke or a burning smell.
8. Accessories
There are different versions of the packages that are sold, but the basic package (which doesn’t have cookware included) includes:
a. NuWave PIC 2 induction cooktop;
b. Quick Start Guide;
c. Owner Guide;
d. Cookbook (how to prepare various recipes using induction);
e. DVD with instructions.
The manufacturer produces an entire line of induction – ready cookware which can be used with the Nuwave PIC 2.
Other brands that users have tested and work well are:
f. Allclad;
g. Revereware (those that don’t have copper bottoms);
h. Circulon Symmetry.
If you want to use this while traveling or camping then you’ll want to buy a storage case made by the manufacturer. The case is water proof, easy to handle, has a shoulder strap and a side pocket for cookbooks.
The surface cleaning is easily done by using a damp dishcloth. The manufacturer advises to clean the surface before using by wiping with a cloth which has been soaked in warm soapy water and squeezed very well. It Is forbidden to put this cooktop in the dishwasherfor cleaning (it being an electrical device and all).
9. Dimensions
Part | Size |
|---|---|
Diameter of cooking surface | 12 inches (30.48 cm) |
Weight | 7 pounds (3.17 kg) |
Width (package) | 14.4 inches (36.57 cm) |
Length (package) | 15.9 inches (40.38 cm) |
Height (package) | 6.3 inches (16.02 cm) |
Weight (package) | 9 pounds (4.08 kg) |
Power Cord | 36 inches |
10. Warranty
Comes with a 1 year complete warranty. Users advise to take an extended warranty. Amazon offers the Square Trade Protection plan which allows you to get 3 more years for a small fee.
I suggest to read the extended guarantee conditions very well because it covers just a specific amount of money spent for repair bythe manufacturer. For example, if you opt for a 3 year extended warranty and choose to be covered for max of $125 in expense you need to pay $15.07.
From my point of view it’s worth it, though, to have peace of mind for 4 years.
11. Pros
12. Cons
13. Consumer Ratings
The NuWave PIC2 is very well appreciated by users because of it’s higher programmable time and very small step of 10 degrees for setting the temperature which allows them to adhere exactly to their favorite recipes.
There are some people who ordered this from the manufacturer’s website where the manufacturer tried to up sell or sell more than the customer wanted and this made the check out process complicated.
Those people who bought from the manufacturer website put their complaints into Amazon so there’s a bit of confusion about the product on Amazon if you don’t read the reviews entirely.
Even so there are only 10% of people who award a very low rating, but they gave the rating to the manufacturer’s ordering process and not to the product. If you order from Amazon I think you’ll be much happier with the ordering process.
14. Price
The manufacturer price list is 169 USD.
Amazon can sell you this at fair price. Also you will find different offers which include cookware at very nice prices.
From my point of view the NuWave PIC2 induction cooktop is worth the money based on the lower – but very efficient watts of 1300 and the ability to heat to 575 F degrees which surpasses the competitors.
15. F.A.Q.
1. Can this Nuwave PIC 2 be used for pressure cooker canning?
Yes, it will work great for pressure cooking: on the website of the manufacturer, you will find that this cooker is suitable for canning, with loads up to 50lbs. Be aware that on the market, you will find a lot of canners made of aluminum that will work on induction.
16. User Manual
Write us in comments and we will send it by email.


